

Already have your invitations printed elsewhere? We can print your envelopes to match—quickly and beautifully!
We will gladly service your envelopes: print on your envelopes guest and return addressing, lined envelopes and stuffing, sealing and mailing.

Guest Address Printing
We offer full addressing services—no handwriting or labels needed. Just send us your list!

Fast Turnaround & Hassle-Free Service
We make it easy! Simply send us your guest list—we’ll handle the rest, quickly and accurately.

Return Address Printing
Add a professional touch with printed return addresses on the back flap or front corner.

Envelope Liner
Want that extra wow? Custom liners to elevate your envelope presentation.

Perfect for Weddings, Events & Business Mailings
Whether it’s a wedding, baby shower, holiday card, or professional event—we’ll make sure your envelopes stand out.
Ready to complete your invitation suite with beautifully printed envelopes?
Let us take care of the details—fast, professional, and tailored to your style.
Your perfect envelopes are just a print away!
Creating Your Envelope Addressing File: A Step-by-Step Guide

Simplify Addressing Tasks with Our Excel Spreadsheet Solution
Effortlessly manage guest lists and envelope addressing with our Excel spreadsheet. Here’s how:
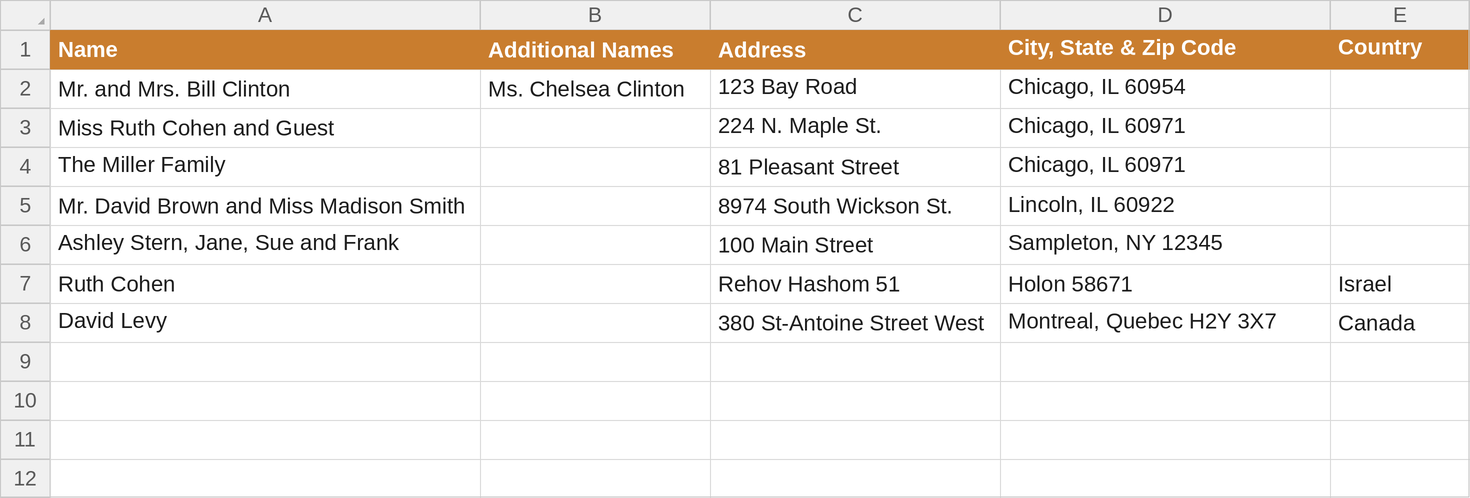
Access the spreadsheet: clearly labeled columns for key information — “Name,” “Additional Names,” “Address,” “City, State & Zip Code,” and “Country.”
2. We’ve created an Excel template for you. Feel free to download it and enter your addresses into it. If you prefer to use your own file, just make sure it matches our template exactly to avoid any additional charges.
Remember to complete the “Country” field only for international addresses; there’s no need to input “USA,” as you are sending the mail from the USA.
Please spell out all words completely — do not use abbreviations. Also, avoid using the “#” symbol, as our calligraphy system will interpret it as “number,” and we do not want to spell out numbers.
3. Email to Us: Save the spreadsheet in this order:
- Cell 1: Name
- Cell 2: Additional Names (if needed, will display on the second line)
- Cell 3: Address and apartment on the same line. If you prefer the apartment on a separate line, please add another cell.
- Cell 4: City, State & Zip Code
- Cell 5: Country
Please send your completed spreadsheet to [email protected]. Our team will handle the rest, ensuring your envelopes are perfectly addressed according to your preferences. We will use the same fonts as your invitation to match your order.
Click to Download Our envelope Addressing Template
Ensure Your Final List Matches the Image Below Exactly:
Utilize Windows Notepad, WordPerfect
or a Similar Word Processing Format:

Using Windows Notepad, WordPerfect, or a Similar Word Processor
Follow these steps to input your information:
- Type each entry, pressing Enter after each line.
- Leave a double space between each entry.
- Format each entry exactly as you want it to appear on the envelope.
- Prefer a spreadsheet? Download our Excel template instead — or use your own file, as long as it matches our template exactly to avoid any additional charges.
Your Final List Must Precisely Match the Format Below
David Cohen
123 Main Street
Teaneck, NJ 07666
Robert Brown
45 Jewel Avenue
Flushing, NY 11375
Once we receive your guest list, we’ll format it and create the layout based on your order.
We’ll email you a proof to review, and you’re welcome to request any changes or corrections. We’ll keep updating the proof and sending it back to you until you’re happy and give us the go-ahead to print.
We look forward to helping you create something beautiful!
Thinking About Purchasing Stamps Ahead of Time?
We completely understand the urge to get things done early — but when it comes to mailing your invitations, we recommend waiting to buy stamps until after you’ve received and weighed your full invitation set.
Why wait?
- Being off by even 1¢ can mean adding an extra stamp to every envelope.
- Paper weight can vary slightly between sets, which may affect postage.
The best approach is to bring 1–3 complete invitations to the post office for an accurate weight before purchasing your stamps.
A tip for presentation: ask the post office to hand-cancel your envelopes. This means they’re stamped by hand rather than run through a machine, which can bend or damage them. It isn’t required, but it helps preserve the pristine look of your mail.
Taking these small steps can save you time, money, and frustration — and helps ensure your beautifully designed invitations arrive exactly as intended.
